Adding Brake Fluid Guide
Adding brake fluid is something that everyone should know how to do. There is a good chance that you will never need to do it, but if you find that your brake fluid is low then you need to know how to put more in.
It is very important that you have the right amount of fluid in your
braking system. If it gets too low, you could find yourself stepping on
the pedal to get the car or truck to stop.. and the vehicle would not stop in time.
Let's take a look at how to add brake fluid correctly.
How to Add Brake Fluid
Here are the steps to take when adding brake fluid:
1. Buy Brake Fluid
Your car or truck takes a specific type of brake fluid. It will be something like "DOT 3" or "DOT 4". The "DOT" just means that it meets the specific standards set by the Department of Transportation. The main difference between the different types of brake fluid is their boiling point.
Most vehicles use DOT 4. It has a higher boiling point (446 °F) than DOT 3 and doesn't cost much more - Click here to find the right brake fluid for your vehicle make and model.
Boiling point is
very important when it comes to brake fluid because if the fluid boils
then it won't work correctly in the braking system. The system is
designed for fluid and not gas. Since gas is compressible it will cause
reduced braking and possible no braking if the fluid boils.
2. Park on a Level Surface
Be sure that your vehicle is parked on a level surface. If it is not
then you will not be able to get a correct reading of how much fluid is
in the reservoir. If you are parked on a slope then one side of the
fluid will be much higher than the other when you are reading the level
on the reservoir.
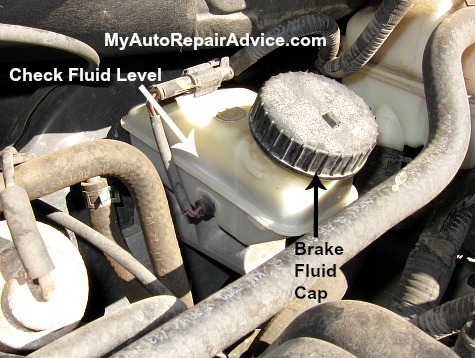
3. Clean Brake Fluid Cap
It is important that no debris gets into the brake fluid reservoir when you open the cap (see image below). If it does, it can eventually make the brake fluid degrade and look very dark in color. Be sure to clean the cap itself and all areas around it so nothing gets in the reservoir.
4. Inspect Fluid Color
Check the fluid color and
make sure that it isn't really dark. If you can see any debris floating
around in the fluid then it's time for a brake fluid change. You can dip testing strips into the brake fluid to see if it has gone bad.
5. Add Brake Fluid
This is the easy part. If your brake fluid reservoir does not have a wide mouth then you will want to use a small funnel for adding the fluid. Then simply pour the fluid in slowly until you can see the level rise to somewhere in between the "low" and "full" marks. Do not fill over the full mark. If you do then it could spill out through the vent in the reservoir and it could get all over your paint and engine compartment.
Brake fluid will eat through paint so it is super important that you
have quick access to water and disposable towels. If you happen to spill it on your
cars paint or in the engine compartment you need to get it off asap.
One of the best ways to do it is to just spray it with water and dry
with a towel. Brake fluid is slippery and a little oily so if you feel
the paint and it's oily or slippery then you need to clean it better.
6. Test Drive
After you have it added and have the cap back on (don't forget this step!), drive your vehicle around and make sure that everything is working. I usually check the brake fluid one more time just to be sure that the level is correct. Now you are a pro at adding brake fluid!
Recommended Tools and Parts for Adding Brake Fluid
Brake Fluid: Click here to find one for your vehicle make and model
Funnel: Hopkins Multi-Purpose Funnel
Testing Strip: Phoenix Systems BrakeStrip
Disposable Towels: Scott Shop Towels
BRAKE FLUID