How to Change Air Filter
How to change air filter guide - Learn everything you will need to know to replace your own air filter.
This job is usually fairly simple and requires minimal tools and experience. In fact, many air filters require no tools at all.
Learning how to change air filter is an excellent place to begin if you're new to auto maintenance and repair. There aren't too many things that you can mess up when replacing air filters... and if you do something wrong, it is generally easy to fix.
To troubleshoot, repair and maintain your vehicle, you'll need diagnostic and repair information that is specific to your car or truck. For this I personally use and recommend ALLDATAdiy. With full manuals for over 30,000 vehicles online, you will find an exact match for your vehicle's year, make and model.
Besides being cheaper than a factory manual, they also offer step by step repair instructions and detailed diagrams beyond what is found in most printed manuals. Click here for a sample of their diagnostic and repair information.
Now that you have a vehicle manual, let's learn how to change the air filter in your car:
1. Buy the Correct Air Filter
The first thing you need is a new engine air filter for your vehicle. The easiest way to buy one is to go Amazon: Replacement Parts: Filters: Air Filters & Accessories and use their "Filter by vehicle" option to find the specific air filter for your vehicle year, make and model.
Alternatively, you can go to an auto parts store and ask the person behind the counter... or you can just go to the air filter section and look in the application guide. There is often a book that you will find hanging from one of the shelves.
After you have the air filter you need to find a nice place to work on your car and open the hood. The air filter box is usually located near the front of the vehicle and either on the right side or left side, not in the center. This box will have screws, bolts or clips that keep the two halves together.
2. Remove the Old Air Filter
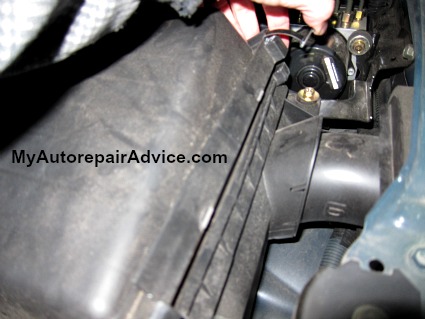
After you get the two halves apart you need to see if you can remove the top half enough to get the air filter out.
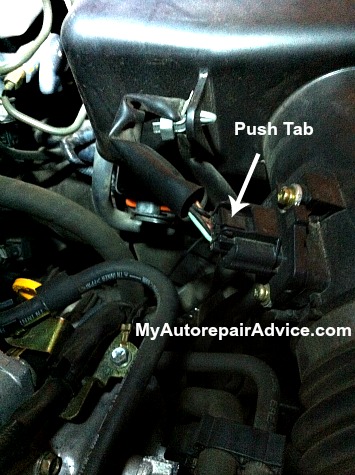
Sometimes this is very easy, other times it is quite hard. If it is not coming off for you to access the filter then you might need to remove any electrical connection or hoses connected to the large air hose or air box. This will allow you to get the top half off enough to get to the air filter and replace it. Be sure to put the connectors and/or hoses back exactly where they go.
After you get the top off of the air box assembly you should see the top of the air filter. You should be able to just grab the edge of it and pull it up. Take it out and put it on a workbench or somewhere fairly clean.
3. Clean Out the Air Box
Then go back to the air box and inspect the inside. I've found strange things inside it is not too unusual to find mouse nests, especially if you park your car outside. It is a good idea to take a shop vac and vacuum this area out. This will help to keep the new air filter clean longer.
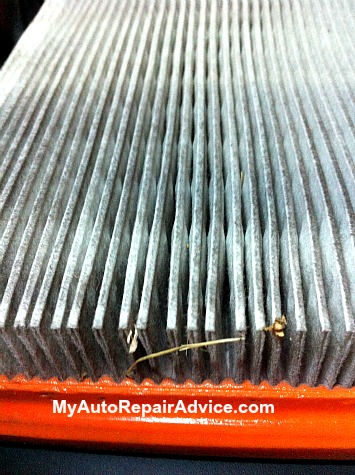
Then go back to the air filter and inspect it. If the whole filter is covered in dirt and debris it is definitely time for a new one. If there is just a small amount of dirt on it then you can probably just re-use it. Since you probably already have the new one and you have it all apart you might as well just go ahead and replace the air filter.
4. Install the New Air Filter
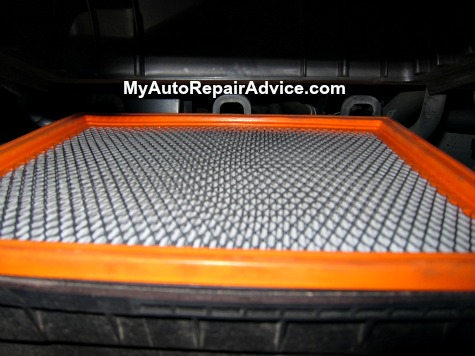
Now that the air box is clean, take out your new filter and compare it to the old filter to be sure they are the same dimension. Then just set it in the air box with the metal grid side facing up as shown in the image below:
Check to make sure that it is fully seated and it doesn't wiggle around much. Then get the top half of the air box and find the tabs that need to align. Some do not have any tabs that align. Many times if there are screws or bolts there are no aligning tabs or pins but if you have metal clips that hold it together then there is probably some type of aligning system on one side.
Push the top half onto the bottom half and make sure everything aligns correctly. If yours has screws then make sure that the screw holes align. If it has tabs make sure they are fully pushed in. When you get them on correctly the top half of the air box will align with the bottom half.
5. Final Check and Start Vehicle
After it is all back together you need to make sure that all electrical connections and hoses are back on in the right places. Also make sure that you have all wiring routed correctly and that everything looks normal.
After that just start the vehicle and run the engine. Watch for the check engine light to come on. If it does then you probably forgot an electrical connector or hose. That's it. Now you know how to replace your air filter.
If you still have any unresolved vehicle problems or questions, you can ask an auto mechanic online. For expert answers specific to your vehicle's make and model, I recommend JustAnswer Car. They have a large pool of certified mechanics to answer your questions for a small fee and you can also browse their answers to other users for free.
ENGINE AIR FILTER
New! Comments
Have your say about what you just read! Leave me a comment in the box below.