How to Change Rotors on a Car
From here we will learn how to change rotors. It is not hard to do for most cars. Follow the steps below and it should be a snap.
STEP 1 to 4: How to Remove Tires and Jack Up Vehicle
5. Remove Brake Caliper
Before proceeding further, you should put on your work gloves first.
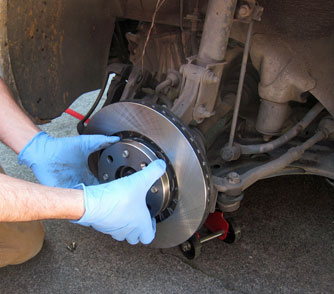
Remove the brake caliper. If you were just replacing the brake pads and not the rotor then you would remove the bolts marked “A” in the photo below. Since I am showing you how to replace brake pads and rotors you will need to remove the complete caliper assembly. You will remove the bolts marked “B” in the photo below. This will take a couple minutes extra, but really not a big deal.
After the bolts are loose (they will be fairly tight) you can usually slide the caliper off with your hands, but you might need to pry on the gently to get them off of the rotor.

After you get it off, use mechanics wire to wire it up to the suspension. This will keep pressure off of the brake hose. If the wire is not used it could cause the brake fluid hose to fail and that would cause the brake system to stop working very quickly because all the fluid would leak out.

6. Remove Old Brake Rotors
Remove old rotor. Some rotors are held in place by screws, but most are not. If there are no screws and the rotor does not come free after removing the caliper then you might need to tap on it gently with a hammer. Be sure to tap right around where the rotor contacts the hub.
Sometimes rust and debris will build up here causing the rotor to stick to the hub. These are some things that can cause problems when learning how to change rotors.


7. Install New Brake Rotors
Manufacturers coat brake rotors with rust inhibitor during the packaging process. This is a sticky film that must be removed before installing a new rotor. Brake cleaner will take it right off. Be sure to put on work gloves when working with brake cleaners as they are harmful to your skins.
Remove your new brake rotors from the packaging and spray them with brake cleaner. Then clean your rotors by wiping them down with a clean cloth or disposable towels.
After the rotor is clean, install it onto the hub. Be sure not to touch the surface of the rotor where the brake pads will ride. You want them to be as clean as possible. Install the screws if it has them.


8. Check Brake Fluid
Check the brake fluid level. If it is on the “full” mark in the brake fluid reservoir then you will need to get some of the fluid out. I use a suction gun to suck out the extra brake fluid.
The reason you need to do this is because when you compress the brake caliper piston, you are pushing brake fluid back up into the brake fluid reservoir. If it is already almost full, then it will spill out all over your engine compartment. Brake fluid will eat into paint so if it gets on anything painted, wash it off as soon as possible. You might even want to keep a small bucket of water nearby in case it spills.

STEP 9 TO 12: How to Remove and Change Brake Pads
RELATED: How to Check Brake Pads
Recommended Tools and Parts for Changing Brake Pads & Rotors
Brake Pads: Click here to find one for your vehicle make and model
Brake Rotors: Click here to find one for your vehicle make and model
Brake Caliper Compressor: Lisle 25750 Dual Piston Caliper Compressor
Brake Cleaner: 3M 08880 High Power Brake Cleaner
Brake Lubricant: Permatex 24125 Ceramic Extreme Brake Parts Lubricant
Disposable Towels: Scott Shop Towels
Floor Jack: Torin T83006 3 Ton Hydraulic Trolley Floor Jack
Jack Stands: Torin T43002 3 Ton Jack Stands
Mechanics Wire: Dorman 9-741 Gauge Coil Mechanics Wire
Pry Bar: Tradespro 835682 Pry Bar Set
Screwdriver Set: Cremax Magnetic Screwdriver Set 10 Piece Set
Socket Wrench Set: Dewalt DWMT73804 34 Piece Socket Set
Suction Gun: Lumax LX-1185 Suction Gun with Vinyl Hose
Torque Wrench: Tekton 24335 1/2-Inch Drive Click Torque Wrench
Wheel Chocks: FloTool 11930MI Heavy Duty Wheel Chocks
Work Gloves: Wells Lamont 167L Heavyweight PVC Gloves